Category: Developer Journal

My Mac Web Dev Setup

My Mac Web Dev Setup

The main reason for the following post is for my personal benefit, so I can reference it and remember exactly how I setup everything when I need to do it again. Hopefully someone else can get something useful from this article, but really, that’s just a bonus. With that said, enjoy.

Before doing all the terminal stuff, you probably want to start with downloading iTerm. This is one of the best Terminal alternatives for Mac.

://www.iterm2.com/

First (real) step, install Homebrew

Homebrew is an essential part of Mac development. It bills itself as “The missing package manager for macOS”. With it we can quickly and easily install any number of packaged applications, utilities, and services.

Open up the terminal and paste the following snippet to download and install Homebrew.

://brew.sh/

/bin/bash -c "$(curl -fsSL https://raw.githubusercontent.com/Homebrew/install/HEAD/install.sh)"

Since we’re going to use the built-in macOS web server, we’ll just setup MySQL

After installing Homebrew, installing other things, like MySQL, is super easy. Just type the following command into your terminal.

brew install mysql
brew install php

Here’s a little fix if later you can’t access your MySQL databases over Socket

// Reference: https://stackoverflow.com/a/18090173
sudo mkdir /var/mysql
sudo ln -s /tmp/mysql.sock /var/mysql/mysql.sock

Using DNSMasq for wildcard URLs and Redirects

// setup dnsmasq for smart urls and redirecting
brew install dnsmasq
#reference: https://gist.github.com/ogrrd/5831371

Edit the DNSMasq parameters to fit your local network setup/IP

echo 'address=/. localhost/192.168.0.188' > $(brew --prefix)/etc/dnsmasq.conf
echo 'listen-address=192.168.0.188' > $(brew --prefix)/etc/dnsmasq.conf

This will add the following to your dnsmasq.conf configuration file (/usr/local/etc/dnsmasq.conf)

address=/.localhost/192.168.0.188
listen-address=192.168.0.188

Setup the DNSMasq resolver directory for your IP address

// create dnsmasq resolver directory and file where 127.0.0.1 is your computer's static IP address
sudo mkdir -v /etc/resolver
sudo bash -c 'echo "nameserver 192.168.0.188" > /etc/resolver/localhost'

Restart DNSMasq

sudo launchctl stop homebrew.mxcl.dnsmasq
sudo launchctl start homebrew.mxcl.dnsmasq

Now, on to the Apache setup

Sorry, no easy terminal commands for this part. Just search through your apache configuration file for these bits and either replace, remove, or comment out.

While I use Sublime Text for pretty much everything else, I use Atom for this. Atom is a wonderful text/code editor and it’s great for editing system files without a problem.

://atom.io

Open the Apache Configuration file (/private/etc/apache2/httpd.conf) and edit the following.

// set the server name
ServerName localhost

// edit the apache config file /private/etc/apache2/httpd.conf
<IfModule unixd_module>
User jonathan // add your username here
Group _www
</IfModule>

// uncomment these modules
LoadModule deflate_module libexec/apache2/mod_deflate.so
LoadModule expires_module libexec/apache2/mod_expires.so
LoadModule rewrite_module libexec/apache2/mod_rewrite.so
LoadModule vhost_alias_module libexec/apache2/mod_vhost_alias.so

// Before High Sierra, uncomment this
LoadModule php5_module libexec/apache2/libphp5.so
// Using High Sierra or beyond, look for something like this:
LoadModule php7_module libexec/apache2/libphp7.so

// comment out this
# <Directory />
# AllowOverride none
# Require all denied
# </Directory>

// change these directories to your web server root (the place you're hosting your sites locally)
DocumentRoot "/Users/jonathan/Sites"
<Directory "/Users/jonathan/Sites">

// uncomment the "httpd-vhosts.conf" file for the virtual hosts to work with dnsmasq
# Virtual hosts
Include /private/etc/apache2/extra/httpd-vhosts.conf

Finally, the Apache Virtual Hosts configuration

Edit the apache vhosts configuration file (/private/etc/apache2/extra/httpd-vhosts.conf)

This uses a free little micro service called nip.io for redirecting stuff on your local network using nice, easy to read URLs.

<Directory "/Users/jonathan/Sites">
 Options Indexes MultiViews FollowSymLinks
 AllowOverride All
 Order allow,deny
 Allow from all
</Directory>

<Virtualhost *:80>
 VirtualDocumentRoot "/Users/jonathan/Sites"
 ServerName home.localhost
 UseCanonicalName Off
</Virtualhost>

<Virtualhost *:80>
 VirtualDocumentRoot "/Users/jonathan/Sites/%1"
 ServerName sites.localhost
 ServerAlias *.localhost
 UseCanonicalName Off
</Virtualhost>

<Virtualhost *:80>
 VirtualDocumentRoot "/Users/jonathan/Sites/%-7+"
 ServerName nip
 ServerAlias *.nip.io
 UseCanonicalName Off
</Virtualhost>

Now, restart the Apache server and MySQL for good measure

sudo apachectl -k restart
mysql.server restart

Network DNS settings

In the System Preferences > Network section you’ll need to add an additional DNS server to your network connection (ethernet or wifi). Click on the “Advanced…” button for your active connection and then the DNS tab at the top of this dialog. Here you’ll need to use the + (plus) button to add, first your development machine’s IP address (in my case it would be the same one I’ve been using in the examples: 192.168.0.188), then the base IP address for your network (generally: 192.168.0.1). After that I usually add in at least one of Google’s DNS addresses (8.8.8.8 or 8.8.4.4) [Read more about that here].

The best, free, SQL database manager for Mac: Sequel Pro

://sequelpro.com/

Once, downloaded, unzip and move the Sequel Pro app to your Applications folder. Now, open it and setup a Socket connection. All you need is to enter “root” in the user field for now. If everything was setup correct you can now connect directly to your local MySQL server and start setting up your databases.

The first thing I like to do is setup a user for all my local databases.

Command+U brings up the User Accounts dialog. Press the + (plus) button at the bottom left of the User Accounts dialog and enter your username and password. Then go to the “Global Privileges” tab and press the “Check All” button and finally, the “Apply” button to save your new user account.

That’s it for database setup. Now you can add all the local databases you want.

Kingdom Hall Specific Branch for PTZ Camera Control

Kingdom Hall Specific Branch for PTZ Camera Control

Updated!

It was requested that, in addition to the generic version of the Camera Control app, I also provide the Kingdom Hall specific variant of the app. So, here it is: https://github.com/counteragent/KH-Camera-Control/releases. You can download the source or download the app/installer for MacOS or Windows respectively.

The main difference in the two branches of the app are the presets. In the normal version the presets are all just numbered buttons. The Kingdom Hall specific one uses various icons I created to show the general use cases for a meeting at a Kingdom Hall of Jehovah’s Witnesses.

You can still find the standard version of the app on it’s Github page: https://github.com/counteragent/Camera-Control

KH Camera Control on Github: https://github.com/counteragent/KH-Camera-Control

Camera Control on Github: https://github.com/counteragent/Camera-Control

PTZ Camera Control App

PTZ Camera Control App

I was recently part of a team responsible for installing PTZ (pan, tilt, zoom) cameras at our local congregation. After looking long and hard for a quality and affordable solution, we ended up with two cameras from PTZOptics. One of the key features we needed in a PTZ camera was the IP stream and control. While the hardware for these cameras is great, the software left a lot to be desired.

The provided software was free and open source. That’s great, but it was a very old html and javascript app, all written with tables and inline css and javascript. In addition it was very buggy, some things as simple as typos meant entire features of the camera were rendered broken. So, I got started looking through the code and at first was just going to fix and clean up what they had provided. After spending some time with it I decided it would be worth it to completely start from scratch.

CameraControl
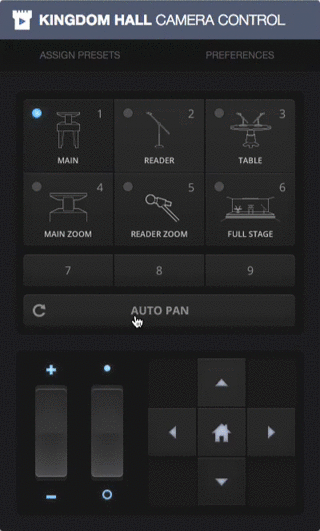
The base functionality of the camera is controlled through a series of urls passed over IP to a CGI script installed in the camera itself. This meant all I had to do was send a url with whatever parameters it called for to the camera’s IP address on the local network. I ended up doing this with jQuery and AJAX requests. The basic UI was built on top of Bootstrap overlaid with custom images and design for all the buttons and pieces of the interface. Rewriting the app also gave me a chance to implement some features the original didn’t have, like a kind of auto-pan function, and saving settings to HTMLs local storage for quick easy setup.

Once everything was in place I realized it could fairly easily be converted into an actual desktop app. Rather than using a web browser to access it, including all the clutter and overhead that comes with, I could have it run in it’s own window and keep the desktop much cleaner. I had never used Electron before but I had heard of it and knew that Github Inc. had built their Atom editor using it. Basically, it packages up web technologies (HTML, Javascript, and CSS) into native OSX, Windows, and Linux apps. After reading through some of the basic docs and going through the starter project I was pretty certain I could use it to build my web app into a desktop app.

A few terminal commands later I had a native Mac OSX version of my web app. This meant I could give it an icon, have it startup with the computer like I needed to, and keep it contained in it’s own small window. Probably my favorite part was designing the icon; I think it turned out pretty good. Once I had a basic app working I continued to tweak it until it felt solid. The last thing I did was to open source the project so anyone else in need of some better software for the PTZOptics cameras would have something more than the buggy old stuff to work with. If you’re interested in the code you can find it over at Github available under the GPL 3.0 license.

Update!

Added compiled, ready-to-use, release version of the app for both Mac OSX and Windows. You can get’em at GitHub here.

Open REST API for Trivia Questions

Open REST API for Trivia Questions

Just finished the first draft of a new open API I’ve been working on for access to trivia questions. If you want to signup for an account (all free and open, remember) you can then make calls to retrieve questions, tags, and categories. You can also post your own questions if you’ve got ’em.

Here’s a sample call to retrieve 20 Jeopardy style questions at an offset (basically pages) of 2:

GET http://trivia.propernerd.com/api/questions?limit=2&offset=2&style=jeopardy

Here’s the response (all responses are JSON):

[ { "id":"106", "user_key":"1", "style":"standard", "difficulty":"0", "category":"Firefly", "question":"From what facility did the ship's doctor Simon rescue his sister River from?", "answer":"Mental", "tags":"sci-fi,pop-culture,western,firefly,serenity,tv,movies", "meta":"", "image":null, "reference":null, "datecreated":"2015-07-21 23:31:43", "datemodified":"2015-07-27 16:39:07" }, { "id":"107", "user_key":"1", "style":"standard", "difficulty":"0", "category":"Firefly", "question":"Simon and River's father had this occupation.", "answer":"Doctor", "tags":"sci-fi,pop-culture,western,firefly,serenity,tv,movies", "meta":"", "image":null, "reference":null, "datecreated":"2015-07-21 23:31:43", "datemodified":"2015-07-27 16:39:07" } ]

For more details on how to use the API check out the homepage: http://trivia.propernerd.com

From Idea to App in One Week

From Idea to App in One Week

I recently had an idea for an app. Something to help keep score while playing basketball. Great, not really a big deal, should be able to do this in a day or so. So, it took about a week once all was said and done, after which it sat in the Apple App Store queue for longer than it took to actually create.

The first thing I did was put together some rough designs in Photoshop. Initially I was thinking it would just be an iPad app, but after talking to some other people I decided to add the iPhone version too. This bit set me back a few more days, thanks to those gaul-dern Adaptive Layouts.

Setting up the basic mechanics of the app was pretty straight forward, plus buttons add points, minus buttons take away points. Two teams, the classic red vs. blue. Each with their own score controls. I really wanted to make the scoring process quick and easy, with big buttons you can easily see and press while actually playing basketball. I imagine the player keeping score would run over to the sidelines to quickly add points or check the score.

From there I realized I wanted to add a game countdown timer to help fill out the app feature set. Just a timer wouldn’t be very useful during a game, but a timer with beeps for the last ten seconds and a final game over buzzer would make everything better. So, that’s what I did.

Once I had all the code in place I could add the iPhone version. I had yet to use the Adaptive Layouts in xcode for iOS 8. I really wish I could use CSS. Adaptive Layouts sound great on paper, but in practice, they don’t really seem to be made for graphically unique and complex interfaces. Also, Interface Builder sometimes seems to randomly adjust things that I thought were already set. It’s a very frustrating experience using one single storyboard for both iPhone (in all it’s crazy sizes) and iPad (so much easier).

Thinking I was going to use the same design for both iPad (my original design) and all iPhone sizes turned out to be a mistake. It ended up being easier and a better UI/UX once I decided to do a separate, streamlined design for iPhones. This meant choosing a compact width device Size Class and disabling pretty much everything and recreating them with different graphics for the compact width devices. It was frustrating but I think made for a much better app in the end.

All in all, I learned a lot about Adaptive Layouts and Size Classes. Things that will definitely help with future projects. I feel like I made a pretty good app given it’s limited use case and the time put into it.

Big Update to my Game Buzzer iPhone App

Big Update to my Game Buzzer iPhone App

I’ve been working hard on adding new features to my connected game buzzer app for iPhone. It’s been on the app store for a little over a year now and I really haven’t done much with it. Once I started the update process, it quickly became much more of a complete overhaul.

There were so many things I wanted to do that just adding them felt like just as much work as redesigning completely, so, that’s what I did. It may have taken me a bit longer than I wanted it to, but I think it’s totally worth it now that it’s finished.

Now that the updated app’s submitted to Apple, I need to turn my attention toward marketing efforts and that means the website for the app. Making an app is not simply making an app.

Once it’s all done, the new app site will be here.